Kenwood DDX419BT Dual Camera Function Explained

Kenwood Dual Camera feature has been around for quite some time now. Nevertheless, there are still questions when it comes to how it works, how to wire it up and also what cameras are suitable for this.
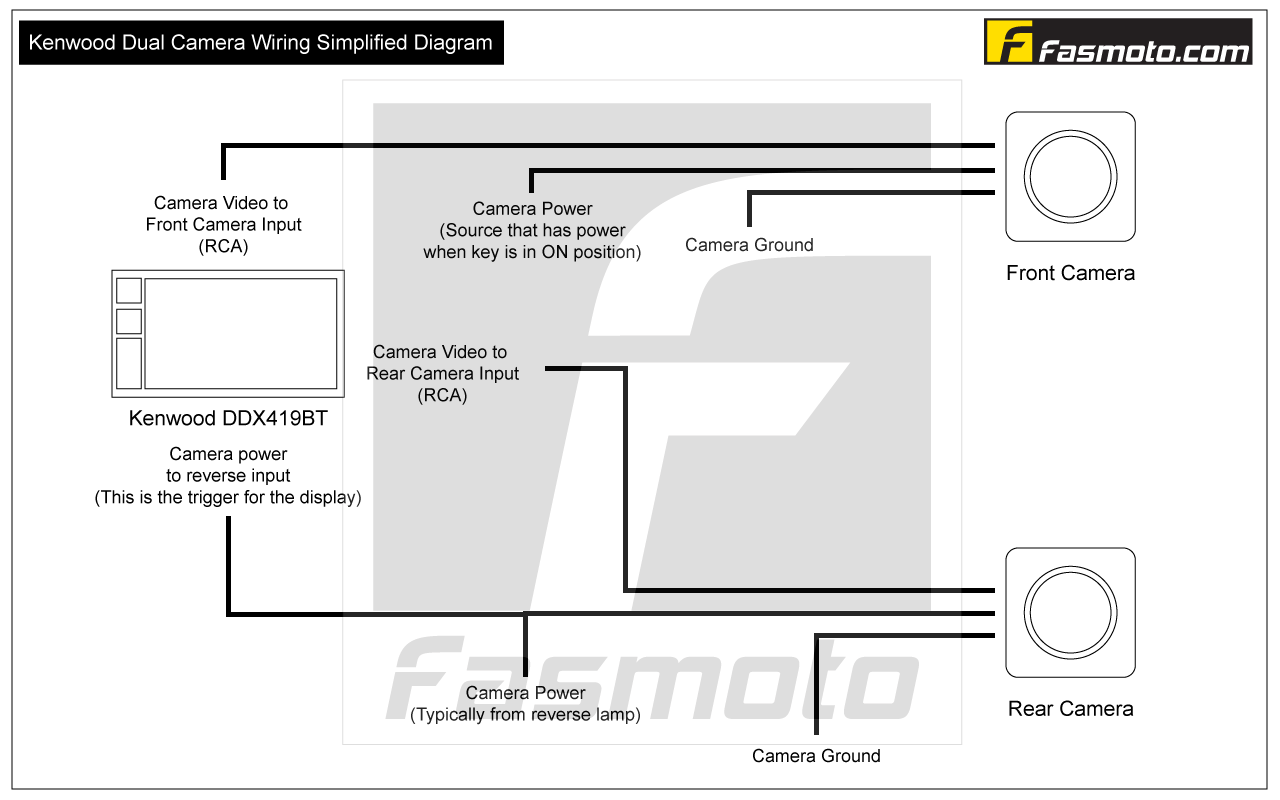
Firstly, it is important to note that this is written based on the Kenwood DDX419BT, however, it may still apply for most most models out there. If in doubt, it is best to check with the seller.
How Does The Kenwood Dual Cam Function Work?
If its your first time with the dual camera function, then its undestandable that you would be curious as to how this works. Basically you have 2 cameras installed, typically one in front and one in the rear, though it is possible that some people may want to be creative and place these cameras elsewhere on their vehicle. But for the sake of this post, we will stick to front and rear.
So, once you have the cameras wired-up accordingly what will happen is that when you engage reverse gear, that would send power to the rear camera and at the same time send a signal to the head unit telling it to switch to rear camera view on the display. This will remain on until you disengage from reverse gear, then the camera will automatically switch to front view for 5, 10, 15 or 20 seconds depending on your settings on the head unit. Then it will switch back to whatever display you had initially be it radio, dvd, spotify, navigation or whatever source you had on last.
There is a cam button on the head unit. This will typically switch the display to the front camera if you have both the front and rear camera installed. That's it on how the dual cam feature works really.
For a better idea, watch this quick video we made below to see a demo of the function. Take note that everytime the display switches to rear view, we are simulating this by sending a voltage signal to the reverse input on the head unit. In actual use, this would usually be wired to the reverse lamp.
What Cameras Will Work?
Basically, most universal cameras would work with the had unit as the inputs are standard RCA. However, there are a few things to note.
Front Camera
- There are no guidelines for the front, so be sure you choose a camera that has the lines built-in should you want this.
- Front camera image can be reversed or flipped on the head unit settings.This means a typical reverse camera can work for front use (this is because reverse cameras are usually reverse image cameras).
Rear Camera
- We recommend getting a camera that by default has no guide lines built-in or can be jumpered to remove the lines. This is because the guide lines on the head unit are adjustable and we think that is better than the static ones built-in on some cameras. However, if you camera comes with guide lines and there is no way to turn it off, then its good to know that you could still turn the guide lines off on the head unit.
- Cameras used for the rear must be reverse or flipped image type by default because there is no way to reverse the image on the head unit.
That's pretty much it. If you have any questions or comments, please feel free to leave them below.
Thanks for reading.